Tips and Tricks from MartyE .com
|
A look inside one of Lionel's pre-Legacysmoke units.
Well in the last Tips and Tricks I mentioned how the newer units are an improvement over the older Lionel smoke units but that doesn't mean the the old units can't be supped up for a better output. Thanks to Norm Charbonneau's tricks, Lionel smoke units can be modified for a better output.
Now I have already "Normalized" this Lionel SD90's smoke unit once before but in recent months it's output has waned so I decided it was time to look under it's hood. I'll take you through the mods recommended by Norm as well as a few other hints I've picked up along the way. As always, all work you choose to do on your engine is at your own risk. None of these procedures are recommended by Lionel and anyone mentioned in this article cannot be held responsible for damage that may occur.
The subject. Lionel's Centennial SD90.
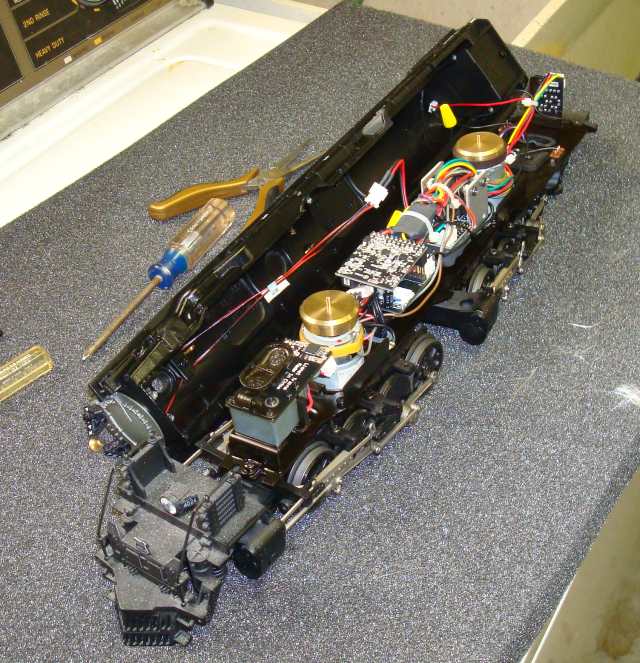
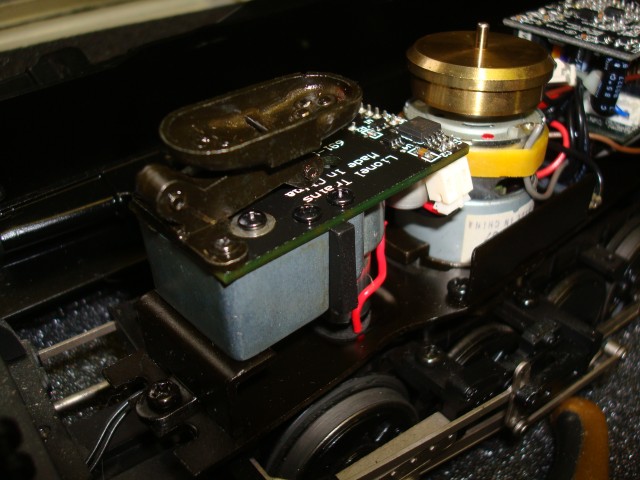
Once opened we can see Lionel stuffs a fair amount of electronics into this engine. What makes it even more difficult is the shell is very narrow making it difficult to get past some of the components and motors. Add to that the crew figures and wiring harnesses that run along the inside if the shell. It makes for some great fun, sarcastically speaking. From the outside the smoke unit looks like the standard Lionel issue.
Packed full of "stuff" makes this engine a bit challenging to work on.
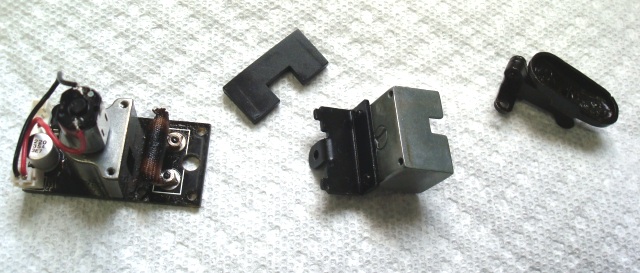
The standard Lionel fan driven smoke unit.
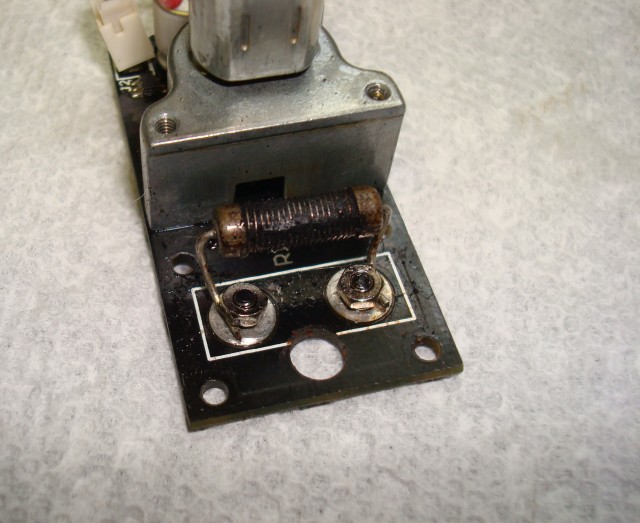
Once the smoke unit is opened up we can see some differences from the standard Lionel smoke unit. The smoke resistor doesn't have the Lionel sleeve, it was carefully cut off, and the bottom of the circuit board has a foil tape on it. Both of these are Norm's ideas. The sleeve was always a disaster. Once it runs dry it quickly burns up and hardens. At that point is no longer able to draw fluid to the heating element so he eliminated it. The foil tape is standard furnace duct tape. The thought is to keep the circuit board slightly isolated from the heat and reflect it back into the unit for better heating of the fluid. I'm not sure if that makes a ton of difference but Norm's a pretty smart guy so I bow to his expertise. The wicking material has scorched and it has baked onto the heating resistor. We'll take care of both of these items.
The wadding is in need of replacement and the element needs cleaned up a bit.
I used a razor blade and carefully scrapped the burnt on residue from the resistor, This is a slow process and with care can be cleaned up quite well. At this time I also made sure my aluminum tape was still in good shape and not contacting any electrical connections.
A cleaned up resistor. Sometimes it works, sometimes you'll have to replace it.
Using Tiki Torch material, I cut of the harder out side material and pull the softer wicking out. These are pretty cheap and I have only used 1 in about 2 years.
I cut the inner wicking material into the size approximately a little larger than the units reservoir. Make sure that you don't over pack it because you still want to maintain a good airflow to get the smoke out of the unit. Before I close up the unit, remembering to re-install the gasket I saturate the Tiki material with smoke fluid. Not enough to have a puddle but really getting the wicking nice and saturated. Put the gasket back in and mount the heating element board back to the housing. Hook up the connections. NOTE: There were reports of some of the fans running backwards. Looking at the unit below one would assume that counter clock-wise would be the correct rotation. If your unit seems to run backwards simply reverse the wires on the fan connector. A small screw drive on the tabs will release them form the connector or you can de-solder them at the motor an swap them. For me the jury is till out whether that makes a big difference. A much better looking wicking. And it works well too.
Before I seal it all back up again I want to make sure that the unit smokes well. Especially with the SD units where removing and putting the shell back on can be quite difficult. Once I am satisfied, I check all connections again, look for any potential issues before the shell goes on and clean up and fluid residue I might have missed.
The smoke unit now serviced is ready for testing.
The
shell is now replaced. There are a few other gaskets that need aligned
with the smoke unit and body but these will pretty much seat themselves.
Just keep an eye on them so they don't get caught where they shouldn't.
The SD's have wiring harnesses in the shell that can be difficult to get past
the electronic without snagging and with the smoke fluid residue the adhesive
holding them can be useless. I actually hot glues some of my wires to the
shell and them smoothed them out with a Popsicle stick to flatten them to the
shell.
Once the shell is on start 'em up and move out. I usually try to add smoke fluid at the end of operating session with smoke. That way the wicking has ample time to absorb the fluid and is less likely to scorch again. About 4-8 drops depending on how long I have been running with smoke. Unfortunately this isn't an exact science so also look for signs of smoke output declining. Add accordingly. Lionel smoke units have never been the best prior to Legacy but you can definitely get some better results with a little effort.
Here's is the smoke unit from the Pre-Legacy Lionmaster Big Boy. Although the wicking procedure is the same, I refrained from adding the foil tape. This unit is several pieces and you can get an idea of how it all goes together. The Big Boy was much easier to work on and the smoke unit was fairly easy to re-pack. Click on any image below for a larger look!
All work is done at your own risk. Lionel, myself, and other parties mentioned in this article are not responsible for any damage resulting in the modification of your smoke unit. Lionel Electric Trains is not responsible for any information in this article. I share these tips freely based on my own experiences and results. Email me with some feedback @ Marty@MartyE.com |


Close this window to back to MartyE.com! |